I didn’t realize just how far south Patagonia was. You might as well go to the Arctic.
Three flights and two buses later, we arrived.
Planning order of operations:
- Check availability for the nights you want to stay
- There is essentially a duopoly of two companies that provide housing options on the W Trail, Vertice for half the W, and Las Torres for the other half. We booked about a month before our trip in December and housing availability was scarce.
- Book your flight.
- Buy national park entry tickets (about a month before).
- Book your bus to the park (a few days before).
- Before your flight, download Bad Bunny’s music and start memorizing.
The most popular route when hiking the W is west to east, but I would recommend doing it east to west.
Why?
Starting from the east means you do the hardest day first, the Torres, instead of saving it for the last day when you’re exhausted after previous days of hiking. It also theoretically means the wind will be at your back. Though, I can’t say I particularly noticed the wind favoring one direction.
It’s also worth asking: do you want to do the entire W, or just a day trip to the Torres? If you’re making the trip all the way to Patagonia, my vote would be to do the entire W.
Almost as expensive as the transportation cost to get to the trailhead, is housing on the trail.
For cost efficiency, you can bring your own tent. However, know that Patagonia is known for crazy winds with gusts up to 75 mph. The one night I slept in a platform tent, which the company provided, I thought it might blow away. You could feel the tent being lifted off the ground. And this was for a tent that had been installed with industrial tooling, in place for who knows how long. Not to mention, not having to carry a tent is awesome.
The weather is extremely temperamental. The forecast can change within a few hours, and you’re likely to get all four seasons in a single day, something you’ll probably hear from the staff along your hike.
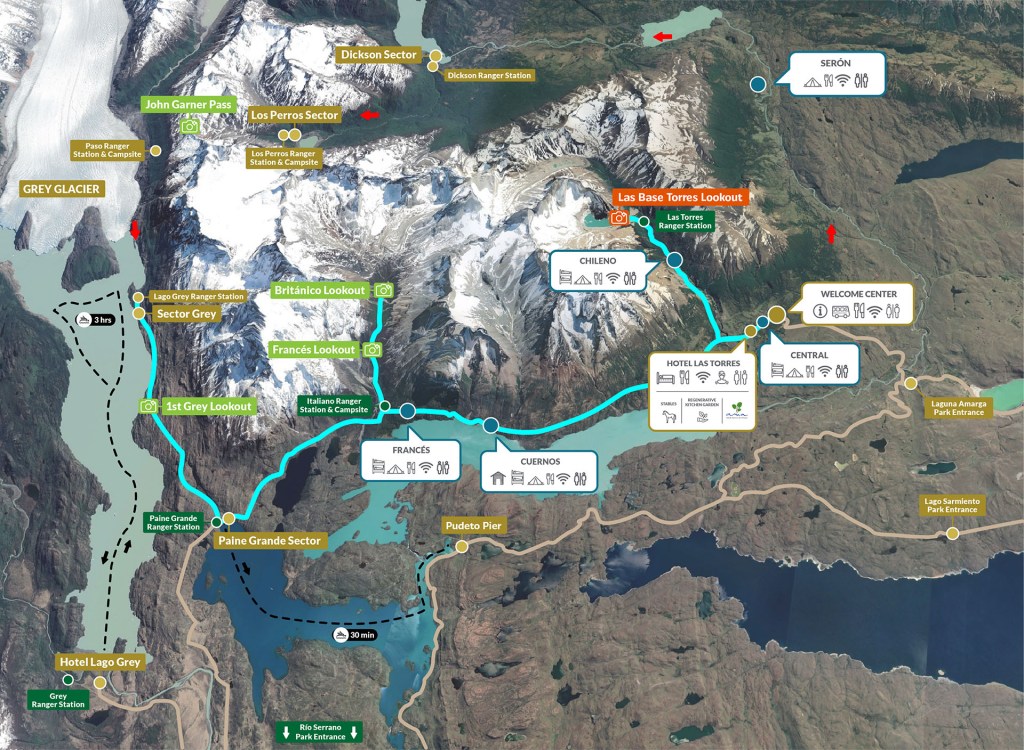
Hiking hack: whether you’re staying at a refugio or not, you can always leave your bag there. For example, if you’re hiking to the Torres, you can leave your pack at Central or Chileno.
At the refugios, food is expensive ($30 for a pizza) and can be surprisingly scarce. A few times when we wanted to order food (this was particularly bad at Cuernos) they turned us down saying they needed to do their dinner service first, after which they didn’t have extra food to sell. Some of the refugios have mini markets, which was really nice. Every refugio had hot water so dehydrated packs is a win here.
All refugios charge for Wi-Fi.
Most flights route through Santiago. We spent a night there before flying to Puerto Natales and another on the way back, which I actually really enjoyed. Here’s a guide for what we got up to in Santiago and Puerto Natales.
5 Days, 4 Nights
Night 1
Central Tower Mountain Refuge / Single Bed — $207 per person
Walk: 11.8 miles from Central up to the torres and back to Central
- 6:30am bus from Puerto Natales (Terminal Rodoviario bus station) to Torres del Paine park entrance → in park at 8 am
- 8am – arrive Laguna Amarga Ranger Station, everyone gets off the bus, show your entry ticket to the park.
- Download the ticket to your phone before you head to the park (there’s no mobile/cell service at the park). We carried a printed copy just in case. Bring your passport/ID as well to present along with your ticket when you check in at the park.
- Look for a wooden sign a foot off the ground that says “Transfer”. This will take you on a 5 min walk to board a shuttle bus that will drop you at the start of the trailhead.
- Shuttles are first come, first serve, CLP$4,000 or USD$5 per person paid in cash as you board (our bus tickets included our transfer ticket)
- 8am – arrive Laguna Amarga Ranger Station, everyone gets off the bus, show your entry ticket to the park.
- After the shuttle dropped us off, we hustled to Central, dropped off our bags, and started walking.
- There’s another refugio called Chileno about half way to the Torres you can drop a bag if you don’t want to hike the last half with your snacks.
Night 2
Cuernos (pronounced “Quernos”)
2-person full equipment tent (sleeping bag and mat) — $300 both
Walk: 7.5 miles from Torres Central to Cuernos
Night 3
Paine Gray — Simple bunk bed in shared room
$65 USD
Walk: 6.8 miles to from Cuernos to Paine Grande
- Most hikers go into the French Valley detour, which brings your milage to about 12–15 mi. We were too cooked to do that.
- The bunk bed room feels very much like a hostel and do not include a sleeping bag, which was an additional ~$35 per person. Insane.
- They do have a mini market where you can buy ramen and chocolate, which was very nice. It feels quite commercialized, definitely one of the less personable refugios.
Night 4
Gray — Simple bunk bed in shared room
$65 USD
Walk: 11.1 miles from Paine Grande to Paine Gray
- It was incredibly windy at the start of this hike. When we arrived, we were so tired that we went to the lookout point the next day instead.
- You can also take a $150+ ferry to walk on the glacier, but it takes 2+ hours each way, so it’s a big time commitment on top of being quite expensive.
- However, they kindly gave us blankets for free. There’s a mini market here as well, and the place feels very cozy with a wood-burning stove.
Night 5
(No night stay)
Walk 6.8 miles to leave Sector Gray and leave Patagonia
- Leave from Gray to Paine Grande Sector
- Ferry catamaran from PAINE GRANDE- PUDETO
- Paine Grande ➡️ Pudeto: 🕘 9:20 AM | 🕚 11:20 AM | 🕔 5:00 PM | 🕡 6:40 PM
- Take a bus back to Puerto Natales
There’s also another great guide here that I’d recommend, it helped a lot while I was planning.
Happy hiking!
